
功能描述:
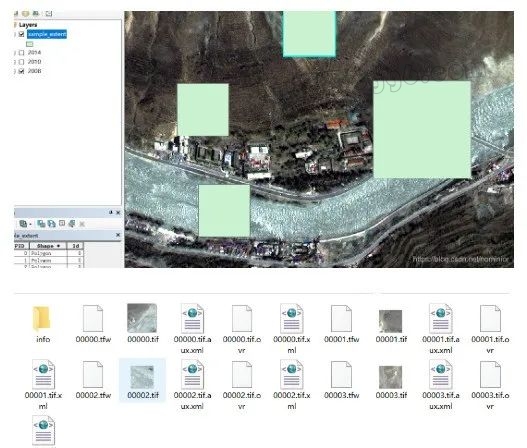
对于含有多个要素的矢量文件shp、栅格影像raster,按照shp中的各要素范围,逐个对raster进行提取,并保存到文件夹中,效果如图所示:
主要思路:
1)获取矢量图层、栅格图层
2)遍历矢量图层中的要素
3)按要素裁剪栅格
(有 Spatial Analysis-ExtractByMask;Clip_management 两种方法)
注意:
在裁剪影像时,可能出现栅格范围小于矢量范围的情况(如果shp200200,栅格只有200199)。
方法1:Spatial Analysis-ExtractByMask,虽慢,但是十分稳定,在可以按矢量范围裁剪,得到200*200。
方法2:Clip_management虽快(约方法10倍速度),但是不太稳定,栅格缺失部分可能无法裁剪,得到200*199。
根据个人对数据精度、速度要求,在代码中选择对应方法:
# -*- coding: utf-8 -*-# @Time : 2020/1/8 15:04# @Author : Zhao HL# @File : extract by mask.pyimport arcpyimport os,timeshp_path = r'E:\rs\sample_extent.shp'img_path = r'E:\rs\m08.tif'save_path = r'E:\rs\test'arcpy.CheckOutExtension("Spatial")def clear_folder(root_path):'''clear all files in root_path(include files in subfolders, but not folders):param root_path::return:'''files_list = os.listdir(root_path)for f in files_list:file_path = os.path.join(root_path,f)if os.path.isdir(file_path):clear_folder(file_path)else:os.remove(file_path)print('clear ' + root_path)def clip_img(in_raster, clip_shp, workspace):'''according to features in the Shp, extract the raters one by one;all result rasters are saved at wordspace according to the FID field in Shp:param in_raster::param clip_shp::param workspace::return:'''if arcpy.GetParameterAsText(0) != '':in_raster = arcpy.GetParameterAsText(0)if arcpy.GetParameterAsText(1) != '':clip_shp = arcpy.GetParameterAsText(1)if arcpy.GetParameterAsText(2) != '':workspace = arcpy.GetParameterAsText(2)clear_folder(workspace)arcpy.env.workspace = workspacet1 = time.time()for row in arcpy.SearchCursor(clip_shp):mask = row.getValue("Shape")FID = int(row.getValue("FID"))FID_name = str(FID).zfill(5)+'.tif'img_8_path = os.path.join(workspace, FID_name)#region method 1: slow but steadymask_raster = arcpy.sa.ExtractByMask(in_raster, mask)arcpy.CopyRaster_management(in_raster=mask_raster,out_rasterdataset=img_8_path,config_keyword="DEFAULTS",background_value=255,nodata_value=255,onebit_to_eightbit="",colormap_to_RGB="",pixel_type="8_BIT_UNSIGNED",scale_pixel_value=None,RGB_to_Colormap=None)#endregion#region method 2: fast but probably get null result#arcpy.Clip_management(in_raster, '#', img_8_path, mask, 0, "ClippingGeometry")# endregiont2 = time.time() - t1arcpy.AddMessage (FID_name+ ' is generated successfully, total time:'+str(round(t2,2)))if __name__ == "__main__":passclip_img(img_path, shp_path, save_path)
实施细节:
1)裁剪出的文件名可以与已有文件重复,考虑到可能多次裁剪重复试验,因此调用clear_folder函数清除保留路径下的所有文件(根据情况自行使用)。
2)Clip_management 可能出现空结果(可能是路径等问题),但比ExtractByMask快数倍。
因此建议调试成功后使用Clip_management 方法。
3)在arcmap中添加脚本,右击my toolbox-new-tool box(新建工具箱),右击新建的工具箱-add-script;第一页设置默认;第二页设置在script file中选择python脚本文件、其余默认;第三页可以设置输入参数,可以跳过,进行(默认参数训练,也可以按照4)设置。
4)输入参数设置
可以直接在脚本中修改,在arcmap中跳过、不设置参数。
也可以在arcmap中按下图,将3个参数均设置为可选选项,方便重复使用。
